well i must say, i have been so much working on the pcb maker for the makerbot and writing a new wiki entry for the makerbot site - to be posted live soon, i havnt updated this much.
so yeah, thats it.
I was wanting to note a few more projects i want to have a go at -
This is Stephanie, an avatar room controller which works using voice commands.
This is something i have wanted to do for many years, and is partially why i got the makerbot in the first place. - to build parts to make an animated face that you could interact with and control stuff using iobridge.
This is a variation of room control - the 'party button'
This one was made in a dorm room, and would be great
this is more of a lower end version - noit as hightech but better in a larger venue
there are others which i will blog about, but for now im off to make a simple eagle pcb to make on my makerbot.
woop woop
Sunday 20 December 2009
Tuesday 15 December 2009
Why to use the nut on the extruder barrel
Just to remind me to writew a small section explaining why a nut is essential.
For those curious for now until a few hours later today till i write it, this is wehat that 4p nut on the brass barrel stops...
http://www.dawning.ca/2009/makerbot-plastruder-crash/
jUST FOUND MY MEMORY STICK AFTER ABOUT A MONTH, - i left it at work, and found my original 'plastic forcing its way out of the ptfe/heater barrel - hence the need for the nut!


you can just see the white of the melted abs poking out of the central hole of the main washer - the second 'bent' washer was to stop the barrel from being forced out.
:D
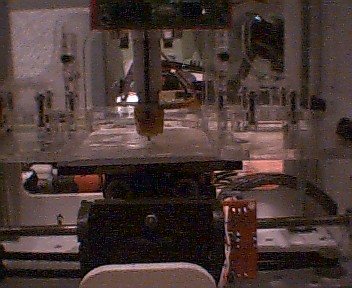
Makerbot pcb tool biTs arrive

@makerbot ray from China has sent me my pcb tool biTs. Tests for PCB making quality in 9 hours . Will do so live testing using ustream of o cam get it to work
Monday 14 December 2009
makerbot gift tags

Deciedd yo give this a go after seeing the reprap printable logo, results are good, on way now to give it to holly, results and reaction to come
Thursday 3 December 2009

Wednesday 2 December 2009
oh and spelling
yeah if you have not realised, my spelling has been poor- but i need new batteries for my keyboard.
and nats nonsence is spelt incorrectly... it should be nats nonsense... rats...
and nats nonsence is spelt incorrectly... it should be nats nonsense... rats...
recieved notification my router bits have arrived!
just got an email from dhl saying a delivery from MegaUK has been marked as delivered, am off home now (via the chinese take away - it was my birthday last saturday, and i fancy cel;ebrtating again with some chinese!) so home now and see what makerbot can do with proper router bits!
Tuesday 1 December 2009
first inverted pcb :D

second test, setting build platform level with masking tape, and using another snapped drill bit as the router, i changed a few settings in eagle to produce this design, based upon the eagle tutorials by (insert name here) on youtube.
my keyboaris playingup so i going to stop here.
also my engraving router bits from mega uk have not come yet so i will try agaiin tomorow
10 X10 cm PCB board cut ready for makerbot PCB testing

Just got some 10x10 PCB boards made u[p to put into makerbot. i need to drill the corner fixing holes but as they were not exactly lined up, i need to do this at home.
Some are double sided, and although it is a bit of a waste using this much for tests, i do have a fair bit of UV photoresist board and i got these boards from ebay at like £2.50 a board (200mm x 300mm double sided) so i think its ok.
i also have som smaller bits i can use.
I ordered 2 of each v cutter drill bits - 10,20,30,45 and 60 degrees, routers are to arrive today!
woop woop!
wouldnt it be fab that a makerbot can 'make' its motherboard as well as parts!
Monday 30 November 2009
engraved pcb and holes test 2
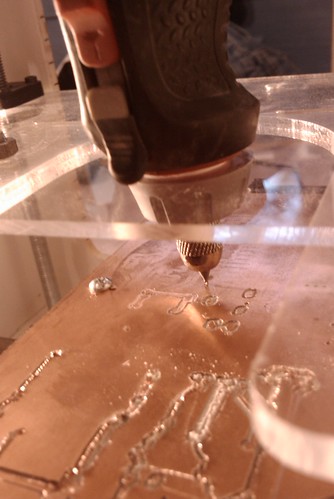
so here we have some holes and engraved tracks. as you can see i nudged it accidently, however they do line up... have a look at the flickr pic to see the notes.
s i was unsure of theoriginal settings, i didnt have the drill bit down far enough to drill some holes, howeveri manually moved it down whil;st building, therefore not all are there.
tomorrow i recieve my etchant, and also 3 router bits, so i can have a play. My v shapped cutters i ordered from an ebay seller in hong kong - carbide v bits, are due t arrive soon, well a week minimum :( but i hope the drill bits i have (100 (well 90 now as i snapped a few) - good thing i bought 100 for £12.50 (regrinds)) and the routers, i should be able to play and have a good try at making it make. I also want to design some nut holders to fit on the z plate, so that it doesnt play or have the change to nut go into the board when the z plate moves down, as it is currently relying on gravity as apposded to making it drill through the board.
Also i need to secure a scrap piece onto the build base (and possibly make it so that i can screw it onto the y carriage so it is secured firmer, and that i can drill al the way through the pcb without ruining or catching on the magnets in the build base.
then i will make a firmer fixing for the dremil into the z stages, as appsed to my (although working) scrap plastic sheet with 3 holes...
anyways, let me know what you think, as your input is helpful
out.
Sunday 29 November 2009
Well, its been a while as i have not had the internet, but i managed to get it printing, i had a new barrel ordered from makerbot.com and also a new ptfe barrel - i got acetone and sorted it all.
i also bult a small heated builkd base, detials to come, but my new experiment is mamkeing pcb's with the makerbot...
results seem to be great so far, however i am using a snapped 1mm carbide driull bit., not an engraving bit as i shopuld be using.
i have bought some, and they will be with me shortly, however i shall put more pics on short;y. i got v shaped bits, and reouting bits... results are shown below.
i wpould write more, but i havnt had any dinner yet, and im suffering from a small hangover from my birthday outing last night!

this is drilling just around holes - no tracks. the width of the drill bit and the offset angle of the base meant it was not just scraping the tiop but going into the fibreglass below. results showed god, but needs new bits!
second test was with tracks...

this again is a rought output, it is using the broken 1mm drill bit, so its not good outoput - just bought these... so results will be
better!
 these aare all 10 degree bits, but i have bought 10, 20, 30 and 60 degree bits, also 4 routing bits... this is how hopefiull i am inn this!
Thursday 1 October 2009


Tuesday 22 September 2009
Twitter!
My twitter section on my blog has gone 'down' so its showing not my posts.
Ps - makerbot stepper mototr driver board chip has been removed (aswell as 2 tracks after they were incinerated) but will solder wire on to fix prob - uni are currently playing with the gerbers and are sorting out making new boards for makerbot, inc stepper boards from the gerber files - however the holes used are mny! 13 drill sizes in total! will @makerbot to let them know to change these sizes so that they can reduce tooling costs in manufacture!
Ps - makerbot stepper mototr driver board chip has been removed (aswell as 2 tracks after they were incinerated) but will solder wire on to fix prob - uni are currently playing with the gerbers and are sorting out making new boards for makerbot, inc stepper boards from the gerber files - however the holes used are mny! 13 drill sizes in total! will @makerbot to let them know to change these sizes so that they can reduce tooling costs in manufacture!
Monday 21 September 2009
glasses?
i nned some new glasses - asking on twitter, i had a few people say i should buy the lenses and then print myself some frames :D
heehee
heehee
Sunday 20 September 2009
Oops guess i need to go to bed before i do anymore damage!

Oops guess i need to go to bed before i do anymore damage!
Saturday 19 September 2009
Wednesday 16 September 2009

Tuesday 15 September 2009

installed first opto

i did break oine of the mounting brackets, but will repla\ace this at later date


making end stops

making endstop number 1, am going to use 0.1inch headers instead of ethernet cables i think... jsut so looks nicer to start with

I have the electronics (and need of new car tyre! lol
am uploading my progress of electronics onto twitter - roboteernat, anf flickr - appears in my flickr pool :D
Monday 14 September 2009
what a day...
its not been a very good day for me, i recieved an email saying my parcel which contained my makerbot electronics and nozzels were in with parcel force awaiting a customs charge. The charge is £47.52... so i go to my car to drive there and pay, when about 50 metres up the road, i hit a HUGE STONE ON THE ROAD, CAUSING A MASIVE GAP IN MY TYRE AND BUCKLING MY WHEEL HUB... and with that, it meant i was late getting to the parcelk office to get my bits, so today has cost me about £150 extra :(
i then went to tesco to comfort buy and eat cr$£ but the good thing is that i got a new wireless keyboard and mouse - its wireless so i can use it in my room on my lap, as apposed to being tethered. - plus was better than half price in tesco - £11.99 - Logitech one
will upload pics soon when i have my usb phone cable
Friday 4 September 2009
Makerbot order
My order is being sent of the makerbot electronics and nozzelds :D - thank you @Clothbot who gave me the heads up that they were on sale, subsequently they sold out 24hours later :D
anyways no internet connection at home, so updates are few, but i will try and get the password :D
anyways no internet connection at home, so updates are few, but i will try and get the password :D
Thursday 27 August 2009
Makerbot on thingiverse :D
So i have finally managed to upload a working makerbot mini design :D
anyways, the main reaon for todays blog, is... PRINTERRS are AWSOME!
spare parts are fruitfull in the printers of old! Went and got an old printer today and got 2 more precision rods from them :) also am ging to get the old pronters from uni scrap pile and take the motors, rods and the end stop sensors from them so i can make my own electronics from it :D
Yay
Monday 24 August 2009
First upload, and a mention on Thingiverse blog
So i just uploaded my first design to thingiverse - looks like this
tho - it may not compile - not sure if im doing it right, but let me know if it doesnt - and i will try again!
whilst i was having a look on thingiverse i came accross this article in the blog:
http://blog.thingiverse.com/2009/08/24/good-enough-for-well-a-lot-actually/
and low and behold, it links to my all-in-one makerbot :D
yay thankyou :D
I will upload more pics when i manage to do more to it - am waiting for the electronics and to get theextruder motor from makerbot stores before i can continue! Am tempted to just get the parts from onecall.farnell.com - as they have all bits in stock, but as you can see from my flickr pool, the first trys at the motherbard etching were not that good!
need to get my bubble etch tank going agin, but as im moving i cant set it up :(
oh well...
Sunday 23 August 2009
Webcam...
Am trying to get my web cam to broadcast from my makerbot - what im going to do is have the pc running in the makerbot, which will be connected wirelessly to my router. It will be running WEBCAMXP5 (or other software thats better) which will send videos from 2 cameras inside my makerbot.
One camera will be on the nozzel so you can watch it squirting, the second will have an overall view of the makeing board. This way, i will try and make a program that can take uploads of stl files, and then produce it, so in theory i can send a file from work, and watch it being made - maybe something i can open up to the world?
Should be fun V- i got the idea from watching this: (website to be found...)
Saturday 22 August 2009
ps
i bought a tap and die set so i could tap some more grub screws into the timing pullys, which haad the wrong diameter holes, and after drilling and buying the set and the grubs, i read the comment on my twitter page about using some material thats half a mm thick to make a collar... I got an milk bottle and cut it up, created the collars and hey presto, its perfect.
Bought:
Tap and die set = £9.99
Grubs 12 for £3
solution
Bit of an old milk bottle:
Cost 49p for the milk bottle in the first place!
LOL
oh well... they are always handy to have i guess...
Bought:
Tap and die set = £9.99
Grubs 12 for £3
solution
Bit of an old milk bottle:
Cost 49p for the milk bottle in the first place!
LOL
oh well... they are always handy to have i guess...
Printers... Plastic... and still no electronics
So i went on my hunt today to get printers and scanners from the tip, but they said in a very deep angry voice "nothing ever leaves this tip" so i though ooh... i best reverse...! no seriously, they dont sell stuff... my tip at home in Portsmouth does tho... odd. so my search has made its way onto twitter, and on to gumtree so i can broaden my search for faulty and broken printers for the precision rods so if you have any, let me know by leaving a comment - btw im in plymouth in the uk :D
I also bought some more plastic from a random company i came accross on the google adverts - they were very local! so i went over and boughtsome more plastic for the heating barrel heat retainer so i can use the proper stuff without it actually melting!
The third thing is, im still wiating to order my plastic and electronics from makerbot, aparently the stepper motor drivers are sold out, but i was wondering if i can buy the set (without these chips) as i can buy them from uk from farnell... (onecall.farnell.com) will email makerbot industries and find out.
Anyways im off to the car boot sale tomorrow to see if i can get some printers...
Wednesday 19 August 2009
Motherboard and PSU arrived.
So i now have everything to make the computer side of the Makerbot. All i need is the makerbot electronics and plastic extruder motor - not to mention the plastic... that Will be coming when the electronics are back in stock!
so... ooh just worked out how to add images to these blog posts!
 This is the power supply, measures only 65x75x120mm but only features one molex and one smaller floppy drive connector. It is only 90 Watts as well... This will be an experiment...
I will make a connecting board which will fit into these ports and the atx, so i can have a connector for the motherboard, as well as one for the motherboard of the psu. If not i will have to revert back to standards.
 The motherboard is a 1GHZ Mini-ITX motherboard with 512mg ram, the hdd will be either solid state, or an old hdd i have. it will just have USB input for the moment, until i can sort out a smaller more powerful PSU that will cope with both the makerbot and motherboard.
 It fits nicely into the existing PSU part of the makerbot. I t has enough space to fit the makerbot electronics upside down on the roof of the PSU hole. What will be difficult, is how to attach these boards to the roof, as screws may stop the x axis from moving, and the heating inside this small space, i will need to add a few more fans... Or direct the heat into the makerbot space, so that this heat aids stopping warping... -That's a good idea nat!

PS, i found a good source of precision rods... -the 8mm rods are standard in any printer! Im going to get some broken ones and steel the rods from them, before i take the to be recycled at the tip - maybe i can get some from the tip? Hmmmmm
so... ooh just worked out how to add images to these blog posts!
 This is the power supply, measures only 65x75x120mm but only features one molex and one smaller floppy drive connector. It is only 90 Watts as well... This will be an experiment...
I will make a connecting board which will fit into these ports and the atx, so i can have a connector for the motherboard, as well as one for the motherboard of the psu. If not i will have to revert back to standards.
 The motherboard is a 1GHZ Mini-ITX motherboard with 512mg ram, the hdd will be either solid state, or an old hdd i have. it will just have USB input for the moment, until i can sort out a smaller more powerful PSU that will cope with both the makerbot and motherboard.
 It fits nicely into the existing PSU part of the makerbot. I t has enough space to fit the makerbot electronics upside down on the roof of the PSU hole. What will be difficult, is how to attach these boards to the roof, as screws may stop the x axis from moving, and the heating inside this small space, i will need to add a few more fans... Or direct the heat into the makerbot space, so that this heat aids stopping warping... -That's a good idea nat!
PS, i found a good source of precision rods... -the 8mm rods are standard in any printer! Im going to get some broken ones and steel the rods from them, before i take the to be recycled at the tip - maybe i can get some from the tip? Hmmmmm
Monday 17 August 2009
A premature announcement about my Makerbot
So,i recieved a package today, and i just cant wait to announce my plans for my makerbot...
Featuring the
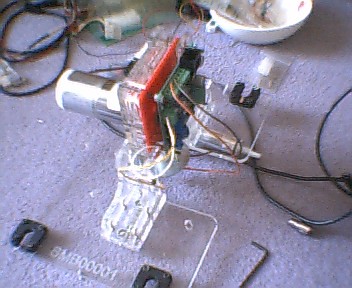
ALL IN ONE Makerbot SMB00001
Featuring...
The makerbot 3D printer
90/200 Watt PSU
1GHz MINI-ITX Motherboard
Wireless keyboard and mouse
10inch LCD Screen (with touch screen in the future)
Requires,
One mains cable
4 batteries for mouse and keyboard.
An ammount of plastic thread
Some imagination
I am in the process of inlarging the chasis to accomodate the motherboard and screen, however it should only increase size by an extra 60mm height and extra 40mm width.
It will feature all internal cables for the screen, computer and makerbot printer, an array of RGB LED's and maybe a carry handle to make it a truly portable printer!
Let me know what you think - mock pictures in my flickr pool (note the screen will be enclosed in plywood case, and feature a plastic screen cover)
Featuring the
ALL IN ONE Makerbot SMB00001
Featuring...
The makerbot 3D printer
90/200 Watt PSU
1GHz MINI-ITX Motherboard
Wireless keyboard and mouse
10inch LCD Screen (with touch screen in the future)
Requires,
One mains cable
4 batteries for mouse and keyboard.
An ammount of plastic thread
Some imagination
I am in the process of inlarging the chasis to accomodate the motherboard and screen, however it should only increase size by an extra 60mm height and extra 40mm width.
It will feature all internal cables for the screen, computer and makerbot printer, an array of RGB LED's and maybe a carry handle to make it a truly portable printer!
Let me know what you think - mock pictures in my flickr pool (note the screen will be enclosed in plywood case, and feature a plastic screen cover)
Sunday 16 August 2009
Car boot sale bargains :D
Looking through the shops which i got the nuts and bolts from, i could not find a brass bolt suitable for the heater element, and eventually gave up my search.
Then noticing in a charity shop lots of brass bits - candle sticks etc. maybe this could be a source of brass for a heater element? right i thought, i had a look but nothing suitable.
Went to the boot sale this morning, and rumaging around for a small tap so i can tap some more grub screws into the pulleys to make them fit squarely on the shaft of the stepper, i came accross 3 boxes of brass bits. Fantastic i thought, had a rummage, and came accross 2 bits of brass rod that seemed to not belong to anything. The lady running the stall said she didnt know what they were for, and allready had spent 20 mins trying to find its match, so she said i could have it for 20p. GREAT!
Just measured them, and they are diameter 7mm and 8mm, with a length of over the 50mm required - see my flickrpool. i also found a plastic rod - which i can use as the insulator... tho i dount its the PTFE i need... DOH, oh well... so im just going to cut the nicest piece into 50mm length, and see if i can make the heater barrel - shame i didnt buy the drill at the car boot sale :( i really need one to drill these holes! HAAHAA
Saturday 15 August 2009
well time for an update.
After recieving my bits ffrom the postopffics, i opened it up, and to my suprise the precision rods i orderes where a bit loose - they are about 6mm diameter not the 8mm i was expecting. Checked the order list and sadly, it is an error on the makerbot website parts list, so watch out!!!
however i still put the belts on and realised that the tooth belts are 6mm inner diameter, where as the motor shafts are 5mm diameter, therefore they are wobbly. I need to drill another 2 holes on the opposing sides so that i can center it using 2 more grub screws.
This morning i went to the screw shop, and got some screws for the extruder - long m4's in the end as they didnt have long m3's...
Went to totem timber and got 3 1metre rods of aluminium, and 50mm washers - for the retainer plate on the extruder.
the aluminium rods i cut to size for the runners, i chose these as they seemed to run free in the plastic bearings. rubed them a little with fine wet&dry paper (wet) and installed.
I then noticed it was rubbing, so loosened the frame for x and y so that it ran smoother.
installed the platforms, and went about glueing the open ended belt into a circle for the z axis - i saw a film on how its made where they spliced a huge belt tog by cutting a layer (a very slowly decreasing slope in one side, and the opposing side to create a much larger surface area to bond the 2 halves tog. I tried it and tested it 30 mins later - the glue had not dried, so tried it again and yay! works... touch wood. tho i did start this l;ast night and left it over night to dry.
Also going to redesign the shell for my additional parts i got from ebay which will bne VERY awsome!!!
Watch this space!!!
pics in my flickr pool
Friday 14 August 2009
IM SO EXCITED!!!
well well well...
Plans are afoot for my mnakerbot, well some plans i cannot disclose just yet till i got all the bits, but...
MY PARTS HAVE ARRIVED FROM SPD-SI!!!!!!!!!!!!!!!!
tho i got to go tothe post office and pay customs charge, but
WOOOOOOOOOOOOOOOOOOOOOOOO
http://www.youtube.com/watch?v=yrIuTlh2dQA
Plans are afoot for my mnakerbot, well some plans i cannot disclose just yet till i got all the bits, but...
MY PARTS HAVE ARRIVED FROM SPD-SI!!!!!!!!!!!!!!!!
tho i got to go tothe post office and pay customs charge, but
WOOOOOOOOOOOOOOOOOOOOOOOO
http://www.youtube.com/watch?v=yrIuTlh2dQA
Wednesday 12 August 2009
Whats that comming over the hedge? is it a monster? nope its a Dinosaur!
That WONDERFUL time has come, Craig in the uni of plymouth tech lab has made a wonderful job cutting out the plastruder pieces on the laser cutter! images to follow in my pool, but its looking FAB!
Sunday 9 August 2009
Plastic for the extruder is on its way :)
I bought some sheet plastic from an ebay seller http://myworld.ebay.co.uk/trent-plastics/ as was the cheapest. I went for clear plastic as apossed to tinted translucent plastic, so i can add colour with the LED.s if i want :)
Shall be here tomorrow or tuesday, and i can get it cut in the laser cutter.
I have also started to make some circuit boards, using my UV box and set-up, haing difficulties witht he timing, as i forgot how long to expose the boards, so now started off with just the end stop sensors.
Shall be here tomorrow or tuesday, and i can get it cut in the laser cutter.
I have also started to make some circuit boards, using my UV box and set-up, haing difficulties witht he timing, as i forgot how long to expose the boards, so now started off with just the end stop sensors.
Saturday 8 August 2009
making pcbs?
starting to make some circuit boards using my etching equip -but not with the bubble etch tank, sas i not got enough acid crystals.
Also having problems about timing, forgot how long to leave the boards in UV for :(
oh well...
chocolate spread on toast is calling!
YUM YUM
Also having problems about timing, forgot how long to leave the boards in UV for :(
oh well...
chocolate spread on toast is calling!
YUM YUM
also...
those who need white paint or black, or grey... and in uk, Poundland sell spraypaint and its only £1 and it gives great results, esp the black!
also... was th9inkning about this last night... What do you do with a spare eeepc 701? sell it you may say, but me... im thinking of installing it into my makerbot to have a complete system setup... :D
rediculas?
hmmm...
also the peltier cooling idea? i am thinking of installing this into my makerbot with the aim of making vertical lines :D
Order has been dispatched :D
My order of bits from sdp-si has been shipped according to an email i recieved, except they are out of the 2 x 17 tooth pulleys, so these will be shipped at a later date, but for now the belrts and gears are on their way :D I did purchase open belt strips, as the other belts were out of stock, so i will have to find a way of attaching the ends tog to make the larger belt for the z axis... we shall see when i get it :D
I sold my ibooks and ipod touch to fund my maker bot and so far its looking great.
I painted the bearing brackets - and got accused of escaping from a mental hospital by the police whilst i was doing so... haha, i also painted the insides white, with the view of using some RGB leds to make it colourful... or just red... but the outside... i dont know what colour - any suggestions?
Pics are on my flickr pool :D
Saturday 1 August 2009
well lots has happened!
well... now i got all my parts back from laser cutter for the main body, i wenrt and spent £16.50 on nuts and bolts - i went twice as the wood i ised was slightly thicker so needed longer lengths, but i also bought black and yellow paint, creamish white pait too for the insides, sanding paper and other bits. Took a while to finish the sanding and cutting - as was using thicker ply, the laser cutter didnt cut all way thru,. so finished off the ctu using my fret saw. now pput it together, painted the x and y and inside, also coated the whole of the wood with a water/paint mix as a base coat.
So far looks good
!
So far looks good
!
Friday 31 July 2009
quick update
well as you can see form my flickr bit, i have made the shell... will updfate later but im at work currently :P
YAY
YAY
Sunday 26 July 2009
Right, i cant wait till tomorrow, i get to make my makerbot on the laser cutter, however need to resize the 4mm sheet plywood design, as its somehow saved itself as to be made 30x20 mm therefopre the pullys are nopw 4mm in diameter :(
Also today i ordered my rods and belts from spi-di but as they dont have 2 of the belts in stock i bought open ended belt, that i can cut and crip together using the clamps on the y and x axis :D
I also bought some of the bolts -and nuts, however i bought 200 m8 nuts, not 200 m3! DOH!!!
i am considering, to make it look nice, to use button headed m3 bols, to give it a nice smooth feel to the edges... we shall see as the cost on ebay is expensive - will see if i can do a deal with the seller (stainlessbolts) to get a better price - but will wait till i have the various wood bits, hopefully tomorrow afternoon!!!
right need to pack my iBook that i sold on ebay to fund my makerbot... YAY
Saturday 25 July 2009
Makerbot laser cut parts
Well, i finally did it, i have taken my new sheets of plywood to uni and handed over the designs, they are going to be laser cut on a 600x800mm laser cutter, make not known, and it will require 3 parts made on the 5mm plywood (6mm) and 1 set on the 4mm plywood. this will also result in spare bits - the x and y parts are duplicated, so incase i break anything i dont have to go back and get it cut - saves time aswell as it is all contained on the one sheet.
after looking on ebay, i decieded to purchase a set of 4 stepper motors - which means i have one nema type 17 spare incase! that cost me a little over £40, but it does work out slightly cheaper than that in the makerbot store if you consider postage.
However, thinking about it, and trying to source that parts for the belts etc, im getting quotes of about £15 for the smaller belt, so it may just be easier to pay the $175 for the complete pack and have done with it. I am also tempted to buy the pack for the electronics gen 3 aswell, m but as some parts are out, then i will have to wait.
Tuesday 21 July 2009
Makerbot, my plans for making one, and the first step!
Hi all, and welcome to my blog.
The reason why i wanted to create this blog was to document my build of my own cnc MakerBot, which im hopefuklly going to build on my own, without buying much from the makerbot stores. I have access to a laser cutter and machinery at university, so i thoought i would have a go.
The first bits i have got are the plywood sheets from a local timber shop, so i bought 6mm (to be made down to 5mm at the joins) and 3.18mm plywood, for the x and y stages.
I have also bought the m8 screw threads for the z axis.
It has been a slow start but i have been looking forward to building a 3d printer for a while. The Reprap started me off, and the ability to make and construct things such as animatronic head and the facial features.
Also having the ability to make the circuits required for this MakerBot, i feel i can make it cheapwer than the costs given, as i have the facilities.
Subscribe to:
Posts (Atom)
