well, pay day is upon us, well its been a few days and aftre sorting out all my other bits ni need to buy, i decieded to put money towards a mk5 and a few other bit and pieces for the makerbot... so putting in my order, i am dreading the cost of uk import tax... estimate it to be about £50 so when it comes i will let you know, but... it has been ordered!
for some reason i cant add a pic... but the total cost was $259.70, thats about £158.
i got:
mk5 plastruder full kit: $185 (£114.42)
2 x lengths of nichrome to replace mk4 bits: $10 (£6.18)
frostruder mk2 experimenters kit - to use on my pcb smt setup: $20 (£12.37)
10 x 3mm gold magnets: $2.50 (£1.54)
and postage: $42.20 (£26.10)
we shall see! its been shipped along with some timing belts to replace the ones i have originally, they were open ended belts glued together with wet suit glue so will eventully break!
but yay,
need to also buy a new stepper motor chip...
Friday, 12 November 2010
Friday, 22 October 2010
Blue magic smoke :(
So, here it is... as im designing a shell for use in a project, which needs to be completed by Wednesday... for the MCM expo! Yes the MCM expo in london next weekend, i go to use my makerbot, and sadly the Z axis starts playing up... then a wiff, snap crackle and pop (and no mini cartoon characters to see for miles) the stepper motor controller decieds to frazzle.
Luckily when the first time this happened, i ordered 2 spare chips, so i can replace the chip, will just take time...
Here goes!
Luckily when the first time this happened, i ordered 2 spare chips, so i can replace the chip, will just take time...
Here goes!
Wednesday, 20 October 2010
Building of wobble arrester and new cable
Well its been an eventfull couple of weeks.
firtly i decieded to change my usb ttl adapter for the makerbot to a 5v logic level, as apposed tothe 3.3v logic level one i was using. the idea behind this was that the switchover signal voltage could have been too low and therefore meant the data was not being sent at good quality. I was annoyed when i bought the first cable, as i was thinking it was a 5v level cable, but alas... oh well.
the first tests came as i was setting up the uni makerbot for a demo of high calibre... more on that in a sec, but i managed to start repg and the new software version, meaning i could import and manipulate the files stl etc in repg.
the first trial pieces were done using my pc desktop, an old pentium 4. (i now bought a i5 HP laptop, so yay!) I did wounder if the processing speed was too slow for the makerbot, and i think i might have been right...
anyway, my first prints using the 5v cable, turned out to be good. they were a corner bracket, to try simple shapes... and then the z wobble arrester. this is an amazing thing an im glad i printed it, as my sides are virtually wobble free (need a second one for other side of rear as that too is a bit wobbly...
anyhow, i printed these with great success, installed the wob arr and set to print something more complex. The gear set, recently uploaded seemd lie the perfetc vhoice.
link here :(insert link)
the results seemed ok, but the thinner smaller gear had to be height adjusted as too much plastic was comming out causing lumps. - this maybe because there wasnt enough time to cool befre the heater nozel came ploughing through, so need to work on 'cool' settings as mentioned in recent blog post elsewhere - should really write the links down!. need to adjust speed and extruder flow rate too, both adjust this issue.
right a picture...
or 2...
the L bracket, shows several wobbly edges so off to print the z wobble arrester...
the wobble arrested whilst printing
The wobble arrester works wonders, and if anyone needs to see why it is handy, check this video out of the one i installed...
with the wobble arrester installed, i made the gears.
picture too come.
Sunday, 10 October 2010
dead...
mkerbot mk4 plastruder is dead. and i dont have money to buy the mk5. uni have bought the last of my nichrome wire so i dont have the ability to rectify, therefore i have decieded to stick it in the loft and forget about it till i have money.
Monday, 27 September 2010
Release of Thing-o-matic

no relation to wallace and gromit, but makerbot have now released the next gen of makerbot! the thing-o-matic provides automatic printing with the belted buikld base and much finer resolution printing!
It is a shame the cost hasd also increased! sadly to import one of these into the UK, will cost £711 for the kit, postage about £30? then charges totalling an estimated £140, making the total cost £900... sadly i cannot afford this, but am very tempted to break open the uni laser cutter and make myself one when the files become available :D
all for now, but check out the details online:
Sunday, 22 August 2010
Solidwork developments

abves y firt trialseeeeeebly wiiiiiiiiiiasme art desghned in solorksTHIWI CME Y EBAL MSCH FORRYYNIAAICCF
and now with new batteries in my keyboard...
Above is my first trial assembly which contasins several parts i designed in solidworks. This will form the eye mech for my animatronic head.
Thursday, 29 July 2010
Animatronic Skin and Teeth
I recently bought some Platsil Gel10 to make robotic skin from www.dauphines.co.uk they did a good price, and also sell plastic human eyes aswell - something cheap and chearfull that i could use on my larger heads.
I bought 2kg tubs of the stuff, as well as skin pigment for the silicone. that and 2 eyes came to £61.20 plus £7 postage.
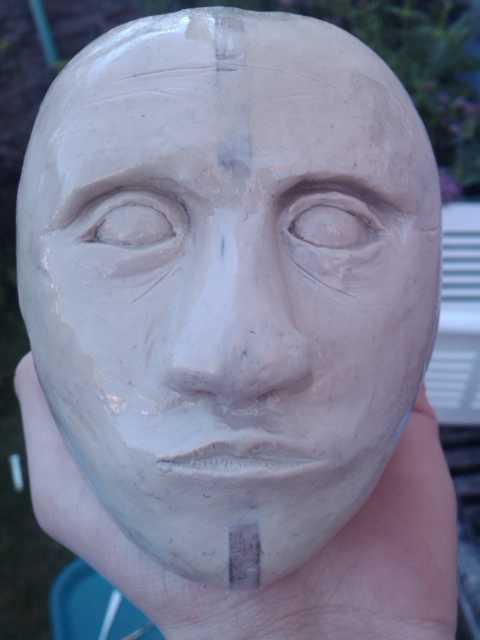
The sculpture i made was of a human head whichj is about 11-12 cm tall

here you can see the small ears i made - these are about 3cm tall.
I started off with 2 inmages from google - a portrait and a side view of a male, i resized both to the same size and then used these to cut out a wooden template. The clay was then sculpted around these 2 pieces to form the smape of the head.
this is a close-up of one of the ears. I am pleased ith this one. I didnt use any references but just feeling my own ears.
Sadly, copying this ear pattern to the other side was more difficult than I thought it would be.
This is the final head with its acrylic coating. I should have spent more time smoothing it down, but this being my first project to hopefully a good portfolio, i wanted to just get it done and see what it looked like.
i then made a mould of the glay head using fibreglass matt and sheet - using gelcoat (sadly not witht he catalyst) and built a 3 segmented mould


The next step was to make the eyes, for this i used 15cm wooden beads which i bought from the local bead-ery shop (lol)
I cut them just past half way, and hollowed out the insides of them, allowing me to fit in a ball joint (will need to change this as it allows full movem,ent not just movement in x and y.)

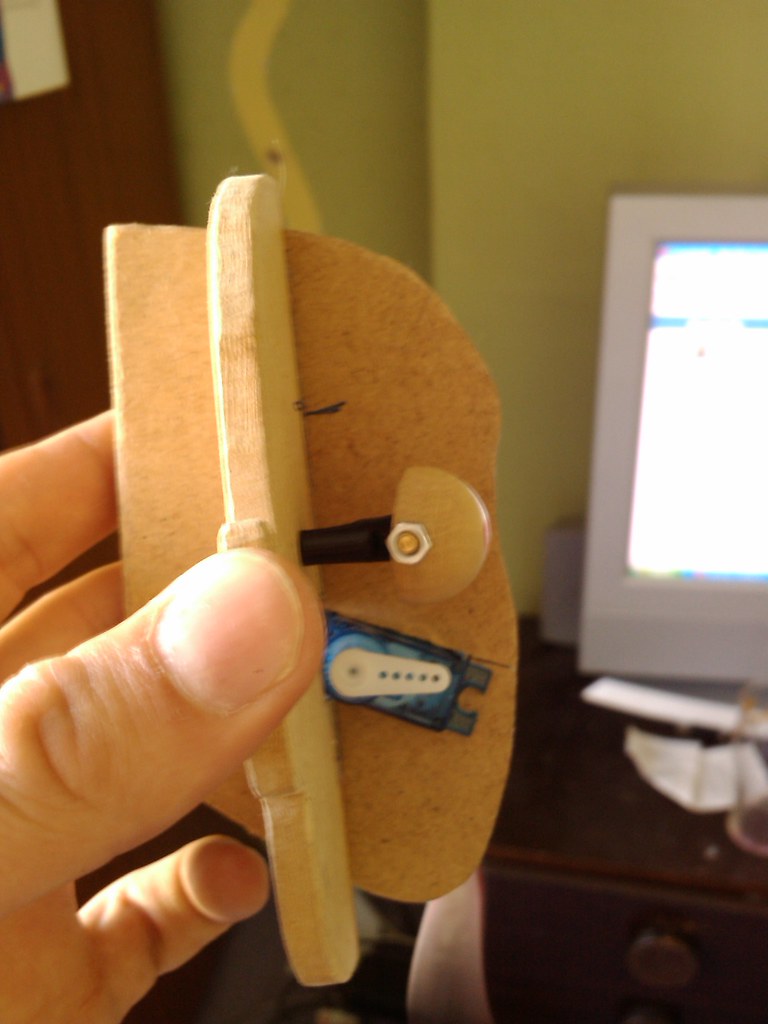
The servo will be mounted behind the eyes, and this is an ongoing task. - the servo seen in the picture is for the jaw.
The wooden shapes are taken from the ear-to-ear template i made for the sculpture.
The front to back piece was cut out using the rear of the mould used for the skin. This means that there is a small gap between the skin and this piece - to be made from aluminium at a later date.

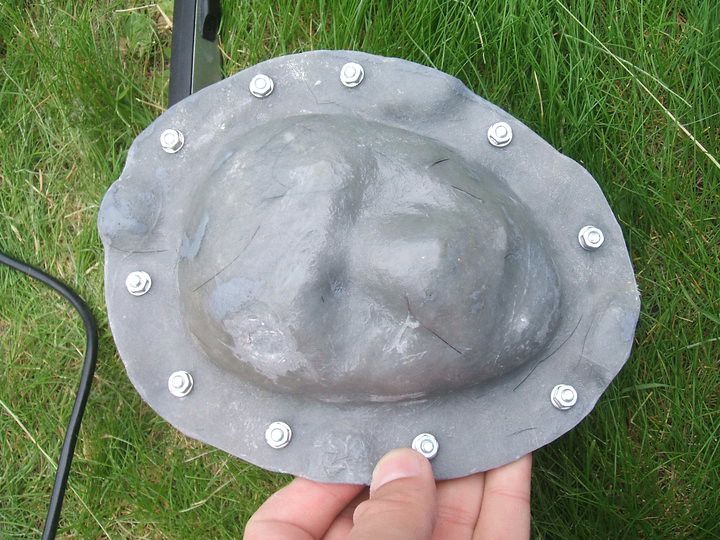
This is the outer skin, it is made by layering thin clay into the negative fibreglass mould, then a layer of fibreglass is layed ontop of this.
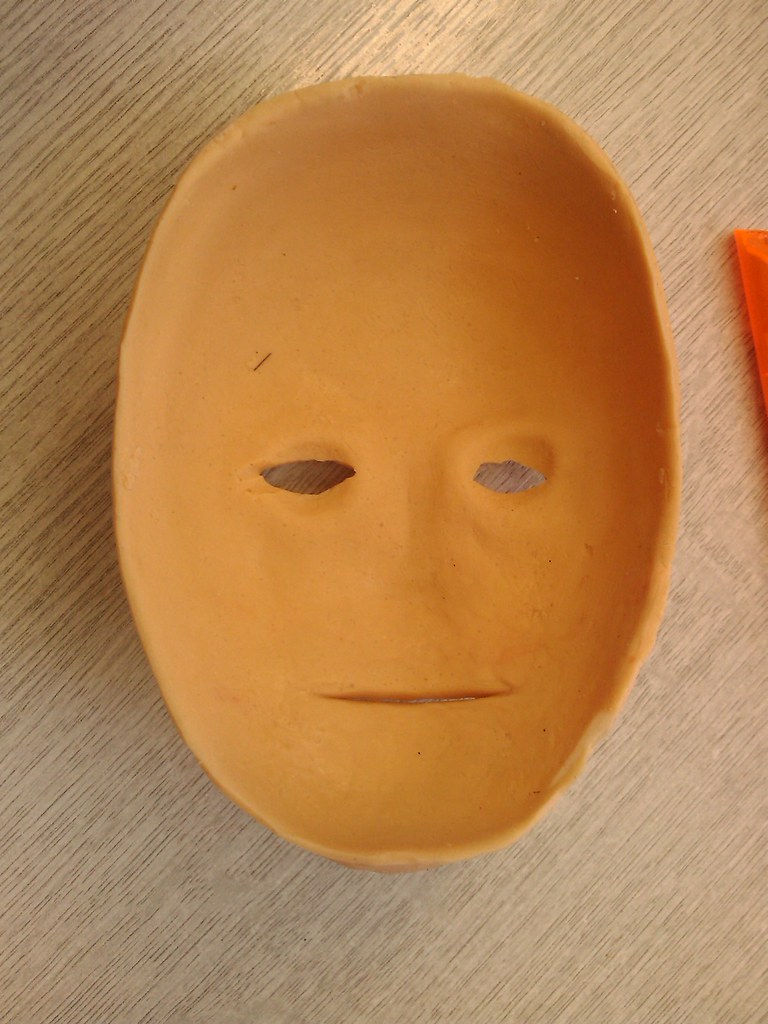
As i did the face seperate from the rest of the head - due to my 3 part mould i made (it doesnt go over a head so i adopted a different method to Daniele Tirinnanzi )
The inner mould was made which overlapped the edge, which means i can refit the inner mould to the existing keys from the front so that it all lines up correctly.
[image to come]
The rear of the skin shows the thickness and the nose which i filled in with the silicone to create a smooth base to fit onto the metal chasis inside when i finished it.
Now onto the teeth:
I purchased some dental acrylic from dentala2z which is actually used to repair dentures (if you know of better supplies, please let me know.)
This method uses powdered acrylic And a liquid (similar to acetone but smells much more potent) which melts and bonds the acrylic particles together. This creates an acrylic liquid which is pourable into the moulds.
I started off with a lump of clay, about 5mm thick, then added a bead of clay around the edge to form the teeth. The teeth were sculpted roughly – again this was my first attempt so I wanted a result, but these were actually good enough anyway. The gum lines were then sculpted into the base layer, and a silicone mould was made using platsil Gel10 (I ran out of standard silicone)
Pouring the acrylic liquid into the mould made castings of the teeth. I did this twice, then using a dremil I cut away the gum part of the casting to reveal just the white teeth.
Using food colouring, I made some more acrylic liquid and turned it red.
I placed the teeth into the mould, using a bit of petroleum jelly to seal the teeth and to stop the red acrylic sticking to parts of the teeth, I poured in the red solution.
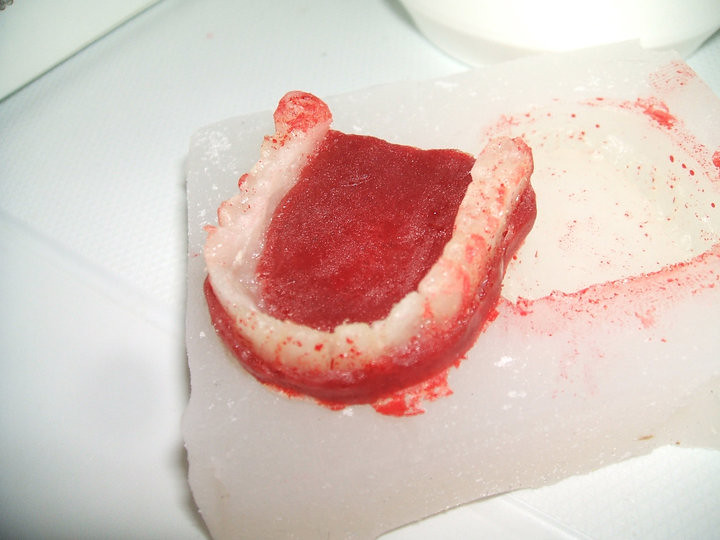
The red gum part is a bit dark, and it also spilled onto the teeth, but because of the petroleum jelly, this was easily cleaned off - tho some staining had occoured. Next time i will be using special gum coloured dental acrylic, sadly i thought i bought white and red coloured stuff, but i hadnt. I will not be using food colouring again and i dont really recomend it!
The final teeth:
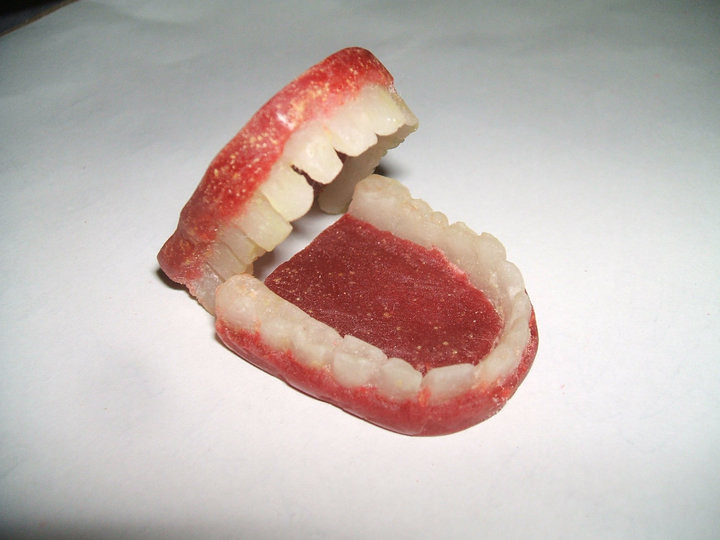
The teeth inside the skin (stretched over my hand)

So there we go, this is where i have got too.
thank you :)
nat :D
I bought 2kg tubs of the stuff, as well as skin pigment for the silicone. that and 2 eyes came to £61.20 plus £7 postage.
The sculpture i made was of a human head whichj is about 11-12 cm tall
here you can see the small ears i made - these are about 3cm tall.
I started off with 2 inmages from google - a portrait and a side view of a male, i resized both to the same size and then used these to cut out a wooden template. The clay was then sculpted around these 2 pieces to form the smape of the head.
this is a close-up of one of the ears. I am pleased ith this one. I didnt use any references but just feeling my own ears.
Sadly, copying this ear pattern to the other side was more difficult than I thought it would be.
This is the final head with its acrylic coating. I should have spent more time smoothing it down, but this being my first project to hopefully a good portfolio, i wanted to just get it done and see what it looked like.
i then made a mould of the glay head using fibreglass matt and sheet - using gelcoat (sadly not witht he catalyst) and built a 3 segmented mould
The next step was to make the eyes, for this i used 15cm wooden beads which i bought from the local bead-ery shop (lol)
I cut them just past half way, and hollowed out the insides of them, allowing me to fit in a ball joint (will need to change this as it allows full movem,ent not just movement in x and y.)
The servo will be mounted behind the eyes, and this is an ongoing task. - the servo seen in the picture is for the jaw.
The wooden shapes are taken from the ear-to-ear template i made for the sculpture.
The front to back piece was cut out using the rear of the mould used for the skin. This means that there is a small gap between the skin and this piece - to be made from aluminium at a later date.
This is the outer skin, it is made by layering thin clay into the negative fibreglass mould, then a layer of fibreglass is layed ontop of this.
As i did the face seperate from the rest of the head - due to my 3 part mould i made (it doesnt go over a head so i adopted a different method to Daniele Tirinnanzi )
The inner mould was made which overlapped the edge, which means i can refit the inner mould to the existing keys from the front so that it all lines up correctly.
[image to come]
The rear of the skin shows the thickness and the nose which i filled in with the silicone to create a smooth base to fit onto the metal chasis inside when i finished it.
Now onto the teeth:
I purchased some dental acrylic from dentala2z which is actually used to repair dentures (if you know of better supplies, please let me know.)
This method uses powdered acrylic And a liquid (similar to acetone but smells much more potent) which melts and bonds the acrylic particles together. This creates an acrylic liquid which is pourable into the moulds.
I started off with a lump of clay, about 5mm thick, then added a bead of clay around the edge to form the teeth. The teeth were sculpted roughly – again this was my first attempt so I wanted a result, but these were actually good enough anyway. The gum lines were then sculpted into the base layer, and a silicone mould was made using platsil Gel10 (I ran out of standard silicone)
Pouring the acrylic liquid into the mould made castings of the teeth. I did this twice, then using a dremil I cut away the gum part of the casting to reveal just the white teeth.
Using food colouring, I made some more acrylic liquid and turned it red.
I placed the teeth into the mould, using a bit of petroleum jelly to seal the teeth and to stop the red acrylic sticking to parts of the teeth, I poured in the red solution.
The red gum part is a bit dark, and it also spilled onto the teeth, but because of the petroleum jelly, this was easily cleaned off - tho some staining had occoured. Next time i will be using special gum coloured dental acrylic, sadly i thought i bought white and red coloured stuff, but i hadnt. I will not be using food colouring again and i dont really recomend it!
The final teeth:
The teeth inside the skin (stretched over my hand)
So there we go, this is where i have got too.
thank you :)
nat :D
Subscribe to:
Posts (Atom)
